
O ar condicionado automotivo é uma parte essencial para garantir o conforto durante a condução, especialmente em climas quentes. A demanda por sistemas de climatização de alta performance tem aumentado, e a escolha dos componentes certos pode fazer toda a diferença. Se você está buscando uma maneira eficiente de melhorar o desempenho do ar condicionado do seu veículo, o Ar Condicionado AC.161 para caminhão da ACTECmax é a solução que você precisa!
O Que é o Ar Condicionado AC.161 para Caminhão?
O ar condicionado é uma peça chave no sistema de climatização automotivo, responsável por manter a temperatura agradável e proporcionar um ambiente confortável para motoristas e passageiros. O modelo AC.161 foi projetado especificamente para caminhões, com alto desempenho e eficiência. Ao escolher o AC.161 da ACTECmax, você está garantindo que seu veículo esteja sempre preparado para enfrentar condições climáticas adversas.
Por Que Escolher o Ar Condicionado AC.161 para Caminhão da ACTECmax?
Com o AC.161, você está adquirindo um sistema de ar condicionado automotivo de qualidade superior, projetado para oferecer desempenho eficiente e duradouro. Confira abaixo os principais motivos para optar por este componente:
1. Materiais de Alta Qualidade
Fabricado em alumínio, o sistema AC.161 oferece excelente troca de calor e alta resistência. Isso não só melhora o desempenho do sistema de ar condicionado automotivo, mas também aumenta a durabilidade do componente, proporcionando uma vida útil mais longa, mesmo sob condições adversas.
2. Design Compatível com Diversos Modelos de Caminhões
O modelo AC.161 foi projetado para ser compatível com uma ampla gama de caminhões e veículos comerciais. Seja para transporte de carga ou como parte de uma frota de veículos, este ar condicionado automotivo garante desempenho e confiabilidade superiores.
3. Certificação ISO e Garantia
A ACTECmax oferece garantia de 1 ano e certificação ISO, garantindo a qualidade e a confiabilidade de seus produtos. Isso significa que você está investindo em um sistema de ar condicionado automotivo que foi rigorosamente testado para atender aos padrões internacionais.
4. Instalação Simples e Prática
O AC.161 é um sistema de ar condicionado automotivo que facilita a instalação, com compatibilidade direta com a maioria dos caminhões. Isso torna o processo de instalação rápido e eficiente, sem a necessidade de ajustes complicados.
5. Preço Competitivo e Quantidade Mínima de Pedido Acessível
Com um MOQ de 50 peças, a ACTECmax oferece preços competitivos para quem busca comprar em grande quantidade, seja para um negócio ou uma oficina de reparo automotivo.
Vantagens do Sistema de Ar Condicionado Automotivo em Caminhões
Além de proporcionar conforto, o ar condicionado automotivo oferece várias outras vantagens, especialmente em veículos comerciais e caminhões:
- Aumento da Concentração: Manter o interior do veículo fresco ajuda o motorista a permanecer mais alerta e focado durante longas viagens, especialmente em condições de calor extremo.
- Melhor Qualidade do Ar: O sistema de ar condicionado automotivo também filtra partículas e poluentes, promovendo um ambiente mais saudável e seguro para motoristas e passageiros.
- Controle de Umidade: Evita a formação de embaçamento nos vidros, proporcionando uma direção mais segura, especialmente em dias chuvosos.
Como Manter o Sistema de Ar Condicionado do Seu Caminhão?
Manter o sistema de ar condicionado automotivo em boas condições requer alguns cuidados básicos, como:
- Troca de Filtros: Substituir os filtros de ar regularmente para evitar que partículas entrem no sistema.
- Verificação do Fluido Refrigerante: Verificar os níveis de fluido refrigerante para garantir que o sistema esteja operando de forma eficiente.
- Limpeza do Evaporador: O evaporador deve ser limpo periodicamente para evitar o acúmulo de sujeira, o que pode comprometer seu desempenho.

Investir no ar condicionado AC.161 para caminhão da ACTECmax é uma maneira inteligente de melhorar o conforto e o desempenho do sistema de climatização do seu veículo. Com sua construção robusta, compatibilidade com diversos modelos de caminhões e garantia de desempenho, o AC.161 é a escolha ideal para quem busca qualidade e confiabilidade em sistemas de ar condicionado automotivo.
Se você está em busca de peças para ar condicionado automotivo de alta qualidade e preço acessível, entre em contato conosco para saber mais sobre nossas ofertas e condições de venda no atacado. Aproveite a oportunidade e garanta o melhor para o seu veículo!

Maintaining your car’s air conditioning system is essential for a comfortable driving experience, especially during hot weather. If your car’s A/C isn’t cooling properly, it might be low on refrigerant. This guide will walk you through how to add refrigerant to your car safely and effectively.
Understanding Refrigerant and Its Role
Refrigerant is the lifeblood of your car’s air conditioning system. It circulates through the A/C system, absorbing heat from the cabin and releasing it outside, ensuring a cool interior. Common refrigerants include R134a and R1234yf, depending on your car’s make and model.
Signs Your Car Needs Refrigerant
- Weak or warm air from the A/C vents
- Hissing or bubbling noise from the A/C system
- The A/C compressor fails to engage
- Visible leaks under the car (may indicate refrigerant loss)
Tools and Supplies You’ll Need
- Refrigerant compatible with your car (check the owner’s manual)
- A refrigerant refill kit with a pressure gauge
- Safety glasses and gloves
- A clean workspace
Step-by-Step Guide: How to Add Refrigerant to Your Car
- Identify the A/C System Type
Locate your car’s low-pressure port, usually marked with an “L” on the cap. The port is often found on the larger A/C hose connecting the evaporator and compressor. - Check System Pressure
Attach the pressure gauge from the refill kit to the low-pressure port. Ensure the reading falls below the recommended pressure for a properly charged system (typically 25-45 PSI, depending on ambient temperature). - Prepare the Refrigerant
Shake the refrigerant can to ensure proper mixing. Attach it to the recharge hose provided in the kit. - Add Refrigerant
Start the car and set the A/C to the maximum cooling setting. Slowly add refrigerant by pressing the trigger on the refill kit. Periodically check the pressure gauge to avoid overcharging. - Monitor the System
As you add refrigerant, feel the air coming out of the vents. Stop adding once the air feels cool and the pressure gauge reads within the recommended range. - Seal the System
Remove the refill hose carefully and replace the cap on the low-pressure port.
Safety Tips When Adding Refrigerant
- Always wear gloves and safety glasses to protect yourself from refrigerant contact.
- Work in a well-ventilated area.
- Do not overfill the A/C system, as excessive refrigerant can damage components.
When to Seek Professional Help
While adding refrigerant is a straightforward process, certain situations require professional assistance:
- If the refrigerant level drops frequently, indicating a leak.
- If the A/C system isn’t working even after adding refrigerant.
- If you’re unsure about the type of refrigerant your car uses.
By following these steps, you can confidently handle how to add refrigerant to your car, saving time and money on professional servicing. Regular maintenance will keep your car’s A/C system in top condition, ensuring a comfortable drive all year round.
About Anchor Group
At Anchor Group, we specialize in automotive solutions, including air conditioning system components and maintenance equipment. Our products and expertise cater to individuals and businesses looking for high-quality tools and advice for vehicle A/C servicing.
- Why Choose Anchor Group?
- Reliable and high-performance tools for refrigerant handling.
- Comprehensive guidance for A/C maintenance.
- A trusted partner for automotive professionals and enthusiasts.
For more tips on how to add refrigerant to your car or to explore our wide range of automotive tools and systems, contact Anchor Group today!

When it comes to maintaining your car’s air conditioning (AC) system, one critical step is pulling a vacuum before recharging the system with refrigerant. This process removes any air, moisture, and contaminants, ensuring optimal performance and preventing damage. In this blog, we will guide you through the steps to pull vacuum on car AC effectively.
Why Pull a Vacuum?
Before diving into the steps, it’s essential to understand why pulling a vacuum is necessary:
- Removes Moisture: Moisture in the AC system can freeze and cause blockages, leading to system failure.
- Eliminates Air: Air can introduce non-condensable gases that affect the system’s efficiency.
- Improves Performance: A vacuum ensures that the refrigerant can circulate freely, maximizing cooling performance.
- Prevents Damage: Moisture and air can cause corrosion and damage to internal components.
Tools Needed
To pull a vacuum on your car’s AC system, you’ll need the following tools:
- Vacuum Pump: A dedicated pump is essential for effectively removing air and moisture.
- Manifold Gauge Set: This tool connects to the AC system and helps monitor pressures.
- Refrigerant Recovery Machine (if needed): If you’re replacing the refrigerant, this machine recovers the old refrigerant before you start.
- Hoses: Ensure you have the appropriate hoses for your system.
- Safety Gear: Safety goggles and gloves are recommended.
Steps to Pull Vacuum on Car AC
Step 1: Prepare the Car
- Ensure Safety: Park the vehicle on a level surface and turn off the engine. Remove the keys from the ignition.
- Access the AC System: Locate the service ports on the AC system. You’ll typically find them near the compressor or the accumulator.
Step 2: Connect the Manifold Gauges
- Attach Hoses: Connect the blue hose to the low-pressure service port and the red hose to the high-pressure service port. Make sure the connections are tight to avoid leaks.
- Open the Valves: Open the valves on the manifold gauge set to allow the system to connect to the vacuum pump.
Step 3: Connect the Vacuum Pump
- Attach to the Manifold: Connect the yellow hose from the manifold gauge set to the vacuum pump.
- Ensure Secure Connections: Double-check all connections to make sure they are secure.
Step 4: Start the Vacuum Pump
- Turn on the Pump: Switch on the vacuum pump. It will start removing air and moisture from the AC system.
- Monitor the Pressure: Watch the gauges on the manifold set. Ideally, the pressure should drop to around 28 inches of mercury (inHg) or lower.
Step 5: Maintain the Vacuum
- Run the Pump: Let the vacuum pump run for at least 15-30 minutes. This duration ensures that moisture is thoroughly removed from the system.
- Check for Leaks: After the initial vacuuming, turn off the pump and observe the gauges. If the pressure rises significantly, it indicates a leak in the system that needs to be fixed.
Step 6: Disconnect the Equipment
- Turn Off the Pump: Once the vacuuming is complete, turn off the vacuum pump.
- Disconnect Hoses: Carefully disconnect the hoses from the manifold gauge set, starting with the yellow hose, followed by the blue and red hoses.
Step 7: Recharge the AC System
- Add Refrigerant: Now that you’ve pulled a vacuum, you can recharge the system with the appropriate refrigerant (usually R134a or R1234yf).
- Follow Manufacturer Instructions: Make sure to follow the specific instructions for your vehicle’s AC system regarding the amount of refrigerant needed.
Conclusion
Pulling a vacuum on your car’s AC system is a vital step in ensuring optimal performance and longevity. By following these steps, you can effectively remove air and moisture, paving the way for a successful recharge of the refrigerant.
Anchor Group Information: For those interested in aftermarket solutions or quality components, Anchor Group is a trusted B2B supplier offering a wide range of automotive AC parts. Whether you’re looking for refrigerants, tools, or other components, we have what you need for your AC system maintenance.
By taking the time to properly maintain your car’s AC system, you ensure a comfortable ride, especially during those hot summer months. Always remember to prioritize safety and follow best practices when working on your vehicle’s air conditioning system.
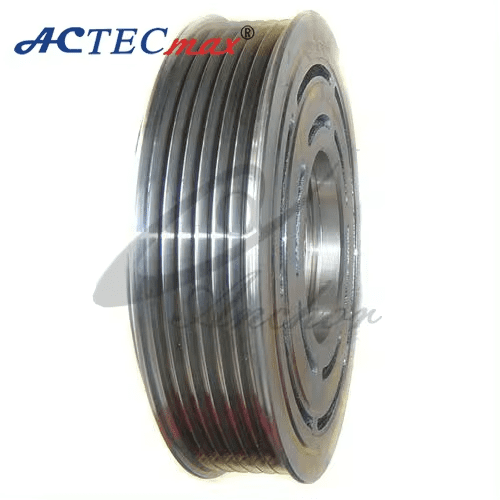
The AC compressor pulley is a crucial component of your vehicle’s air conditioning (AC) system, playing a significant role in ensuring that your car stays cool and comfortable during hot weather. It works alongside the compressor to manage the flow of refrigerant, which is essential for the cooling process. In this article, we will delve into the details of how the AC compressor pulley works, its importance, signs of failure, and how to maintain it for optimal performance.
What is an AC Compressor Pulley?
The AC compressor pulley is attached to the compressor and is driven by the serpentine belt of your car’s engine. When the AC is turned off, the pulley spins freely, and when the AC is activated, it engages the compressor through the clutch system. The clutch system allows the pulley to either drive the compressor or let it spin freely, depending on whether the AC system is in use.
Key Functions of the AC Compressor Pulley:
- Engagement and Disengagement: Controls when the compressor is activated based on whether the air conditioning system is in use.
- Transfer of Power: Transfers mechanical power from the engine to the AC compressor.
- Refrigerant Flow Regulation: Helps in controlling the flow of refrigerant through the AC system for efficient cooling.
Importance of the AC Compressor Pulley
The proper functioning of the AC compressor pulley is vital for maintaining the efficiency of your vehicle’s air conditioning system. Without a functional pulley, the compressor cannot circulate refrigerant, and the air conditioning system would fail to provide the necessary cooling.
Signs of a Failing AC Compressor Pulley
Recognizing the signs of a failing AC compressor pulley can help prevent further damage to the AC system and save you from costly repairs. Here are some common symptoms to look out for:
- Loud Grinding Noise: A worn-out bearing in the pulley often produces a grinding or squealing noise.
- AC System Not Cooling Properly: If the compressor pulley fails to engage, the air conditioning system will not cool the cabin efficiently.
- Visible Damage: Cracks or chips on the pulley indicate potential failure and should be replaced promptly.
- Clutch Failure: If the AC clutch does not engage or disengage properly, it could be due to a faulty compressor pulley.
- Burning Smell: A burning odor may be a sign that the pulley is seizing up or that there is too much friction.
How to Maintain Your AC Compressor Pulley
Maintaining the AC compressor pulley is essential for the long-term efficiency of your vehicle’s air conditioning system. Here are some maintenance tips:
- Regular Inspection: Check the pulley for any signs of wear or damage every few months.
- Clean the Pulley: Ensure that dirt and debris are not accumulating on the pulley as this can cause wear and tear.
- Lubrication: Keep the components well-lubricated to reduce friction and prevent premature failure.
- Check Belt Tension: Make sure that the serpentine belt driving the pulley has the correct tension and is not slipping.
Benefits of a Well-Maintained AC Compressor Pulley
- Increased Cooling Efficiency: A properly functioning compressor pulley ensures that the AC system runs efficiently, providing consistent cooling.
- Extended Compressor Life: Regular maintenance of the pulley can extend the life of the AC compressor, saving you money in the long run.
- Reduced Repair Costs: Identifying issues early on and replacing worn-out parts can prevent major damage to the entire AC system.
- Improved Fuel Efficiency: An efficiently running AC compressor reduces the load on the engine, leading to better fuel economy.
When to Replace the AC Compressor Pulley
If you notice any of the symptoms mentioned above, it’s time to inspect the AC compressor pulley. Replacing a faulty pulley is crucial to prevent further damage to the compressor and other parts of the air conditioning system. It’s recommended to consult with a professional mechanic for a proper diagnosis and replacement.
Conclusion
The AC compressor pulley is a small yet vital component of your vehicle’s air conditioning system. Keeping it in good condition is essential for the performance and longevity of your AC unit. Regular maintenance and timely replacement of faulty components will ensure that your car’s air conditioning system continues to keep you cool and comfortable during the hottest days.
Anchor Group Information
Anchor Group is a trusted wholesale supplier and manufacturer of automotive air conditioning parts, including high-quality AC compressor pulleys. We provide durable and reliable components designed to meet the needs of professional mechanics and DIY enthusiasts. For bulk purchases or wholesale inquiries, reach out to our Anchor Group Wholesale Department. As a leading B2B supplier, we offer competitive pricing, excellent support, and a range of products tailored to your requirements.

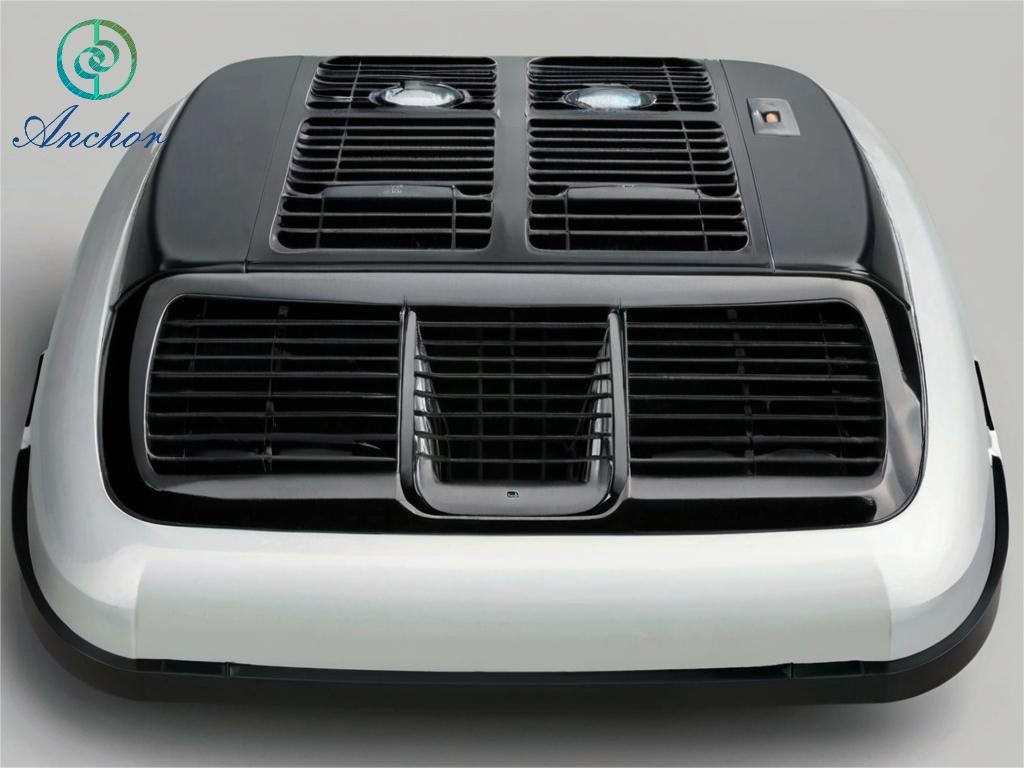
When it comes to long-haul trucking, comfort is key. After spending hours on the road, a comfortable and cool cabin can make all the difference in a trucker’s journey. This is where a rooftop air conditioner for semi truck comes into play. Designed specifically for heavy-duty vehicles, these AC units ensure that drivers stay cool and comfortable, no matter how hot it gets outside. In this blog, we’ll explore the benefits of installing a rooftop air conditioner in your semi truck, what to look for when choosing one, and why it’s an essential investment for long-haul drivers.
Why Choose a Rooftop Air Conditioner for Your Semi Truck?
A rooftop air conditioner for semi truck is more than just a luxury; it’s a necessity for anyone who spends extended periods on the road. Here’s why:
- Optimal Cooling Efficiency:
- Rooftop air conditioners are designed to provide maximum cooling power, ensuring that the entire cabin is kept at a comfortable temperature, even in extreme heat.
- Space-Saving Design:
- Since these units are mounted on the roof, they don’t take up any valuable cabin space, leaving more room for other essentials.
- Durability:
- Built to withstand the rigors of the road, rooftop air conditioners are made from durable materials that can handle the vibrations, dust, and varying weather conditions encountered during long trips.
- Energy Efficiency:
- Modern rooftop AC units are designed to be energy efficient, reducing the strain on your truck’s battery and fuel consumption.
- Ease of Installation:
- Most rooftop units are straightforward to install, often requiring minimal modifications to your truck.
What to Look for in a Rooftop Air Conditioner for Semi Truck
When selecting a rooftop air conditioner for your semi truck, there are several key factors to consider:
- Cooling Capacity:
- Measured in BTUs (British Thermal Units), the cooling capacity determines how much space the AC unit can effectively cool. For semi truck, a unit with a higher BTU rating is generally better, as it can handle larger cabin spaces.
- Power Requirements:
- Ensure that the AC unit you choose is compatible with your truck’s power system, whether it’s a 12V, 24V, or 48V setup. Some units also offer dual voltage capabilities.
- Noise Level:
- Consider the noise level of the unit, especially if you plan on resting or sleeping in the cabin while the AC is running. Look for units that offer quiet operation.
- Build Quality:
- Opt for units made from high-quality materials that can withstand the harsh conditions of long-haul trucking, such as extreme temperatures, dust, and vibrations.
- Ease of Maintenance:
- Look for units that are easy to maintain, with accessible filters and components that can be cleaned or replaced without hassle.
The Benefits of Installing a Rooftop Air Conditioner in Your Semi Truck
Investing in a rooftop air conditioner for your semi truck offers numerous benefits:
- Improved Comfort:
- A comfortable driver is a more focused and productive driver. By maintaining a cool cabin, you reduce the risk of fatigue and heat-related discomfort.
- Enhanced Resale Value:
- Trucks equipped with high-quality AC units tend to have a higher resale value, as they are more attractive to potential buyers.
- Better Sleep Quality:
- For truckers who sleep in their rigs, a rooftop AC ensures a restful night’s sleep by keeping the cabin cool, even in hot climates.
- Increased Productivity:
- With a cooler cabin, drivers are less likely to experience fatigue, leading to better concentration and safer driving.
- Energy Savings:
- Modern rooftop AC units are designed to be energy-efficient, which can save fuel and reduce the overall cost of running your truck.
Anchor Group – Your Trusted Supplier for Rooftop Air Conditioners
When it comes to purchasing a rooftop air conditioner for your semi truck, it’s essential to work with a trusted supplier. Anchor Group is a leading B2B supplier of high-quality automotive air conditioning units, including rooftop air conditioners for semi truck. Known for their reliability and performance, Anchor Group’s products are designed to meet the needs of long-haul truckers, ensuring comfort and efficiency on the road.
Conclusion
A rooftop air conditioner for semi truck is more than just a convenience; it’s an investment in your comfort, health, and productivity. By choosing the right unit, you can enjoy a cool, comfortable cabin no matter where your journey takes you. For top-quality AC units that you can rely on, consider Anchor Group – your partner in keeping cool on the road.
In this comprehensive guide, we’ll delve into the world of roof air conditioners, exploring their benefits, installation process, energy efficiency, and more. Let’s dive in!
Understanding Roof Air Conditioners
Roof air conditioners, also known as rooftop AC units, are compact cooling systems designed to provide efficient climate control in various settings. From RVs and campers to commercial buildings and residential homes, these versatile units offer cool comfort wherever they’re installed.
Benefits of Roof Air Conditioners
1. Space-Saving Design
Unlike traditional AC systems that occupy valuable floor space, roof air conditioners are installed on the roof, freeing up room inside your vehicle or building. This space-saving design allows for more flexibility in interior layout and ensures optimal cooling without sacrificing space.
2. Efficient Cooling Performance
Roof air conditioners are engineered for maximum efficiency, delivering powerful cooling performance even in the hottest conditions. With advanced technology and superior airflow design, these units can quickly lower temperatures and maintain comfortable indoor environments.
3. Easy Installation Process
Installing a roof air conditioner is a straightforward process, especially when compared to traditional split-system AC units. With basic tools and a bit of DIY know-how, you can have your rooftop AC up and running in no time, saving both time and money on installation costs.
Energy-Efficient Operation
One of the standout features of roof air conditioners is their energy efficiency. These units are designed to consume less power while providing optimal cooling performance, helping you save on energy bills and reduce your carbon footprint. With eco-friendly operation, you can stay cool without worrying about excessive energy usage.
Choosing the Right Roof Air Conditioner
When selecting a roof air conditioner, several factors come into play:
- Size: Ensure the unit’s dimensions fit your vehicle or building’s roof space.
- Cooling Capacity: Consider the unit’s BTU rating to match it with your cooling needs.
- Features: Look for features such as adjustable airflow, programmable settings, and remote control for added convenience.
Installation Process
Step 1: Preparation
Gather all necessary tools and equipment, including mounting brackets, screws, sealant, and a power drill.
Step 2: Roof Mounting
Securely mount the roof air conditioner onto the roof using the provided brackets and screws. Ensure proper alignment and stability before tightening the screws.
Step 3: Electrical Connection
Connect the unit’s wiring to your vehicle or building’s power supply according to the manufacturer’s instructions. Double-check all connections for accuracy and safety.
Step 4: Testing
Turn on the roof air conditioner and test its operation to ensure proper cooling performance. Adjust settings as needed and monitor for any issues or abnormalities.
Conclusion: Embrace Cool Comfort with Roof Air Conditioners
In conclusion, roof air conditioners offer a convenient and efficient cooling solution for a wide range of applications. With their space-saving design, energy-efficient operation, and easy installation process, these units provide cool comfort wherever you go. Upgrade to a roof air conditioner today and stay cool even in the hottest weather!
https://www.acparts.cn/product-category/parking-cooler/
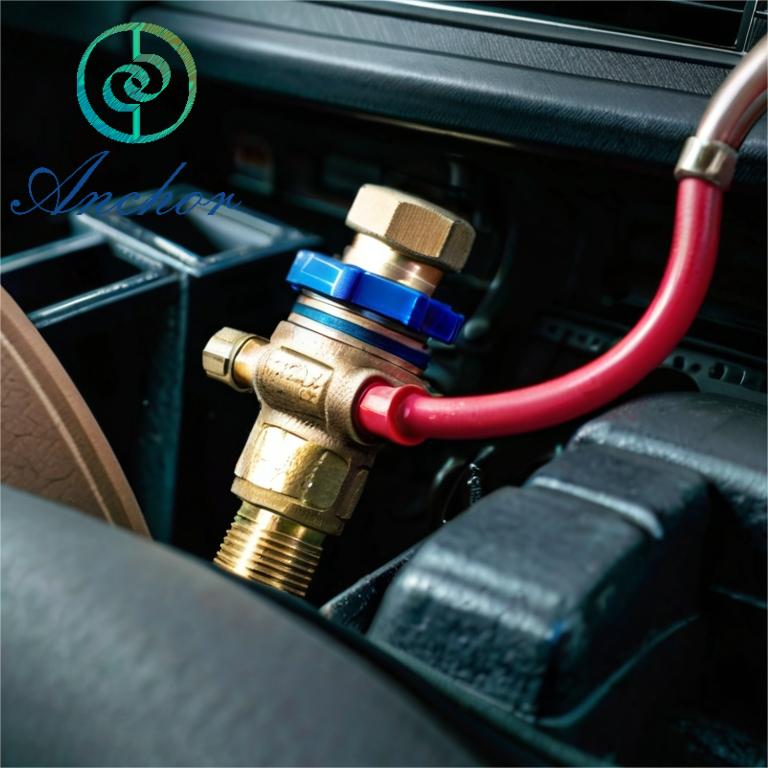
When it comes to maintaining your car’s air conditioning system, cleaning the expansion valve is a crucial yet often overlooked task. The expansion valve plays a significant role in regulating refrigerant flow, ensuring optimal cooling performance. Over time, dirt, debris, and contaminants can accumulate within the valve, leading to inefficient operation and potential system malfunctions. In this comprehensive guide, we’ll walk you through the step-by-step process How to Clean Car Expansion Valve to ensure peak performance and longevity.
Understanding the Expansion Valve
Before diving into the cleaning process, it’s essential to understand the function of the expansion valve within your car’s AC system. The expansion valve is responsible for regulating the flow of refrigerant into the evaporator coil. By controlling the amount of refrigerant entering the coil, the valve helps maintain the desired temperature inside the vehicle.
Signs Your Expansion Valve Needs Cleaning
Several indicators suggest that your car’s expansion valve may require cleaning:
- Poor Cooling Performance: If you notice a decrease in cooling effectiveness or inconsistent cooling throughout the cabin, it could indicate a clogged or malfunctioning expansion valve.
- Icing on Evaporator Coil: Excessive buildup of ice on the evaporator coil can be a sign of restricted refrigerant flow, often caused by a dirty expansion valve.
- Strange Noises: Unusual sounds coming from the AC system, such as hissing or gurgling noises, may indicate issues with the expansion valve or other components.
Step-by-Step Cleaning Process
Now, let’s delve into the detailed steps involved in cleaning your car’s expansion valve:
1. Gather the Necessary Tools and Materials
Before starting the cleaning process, gather the following items:
- Safety Gloves and Eyewear: To protect your hands and eyes from chemicals and debris.
- Refrigerant Recovery Equipment: If you plan to remove refrigerant from the system before cleaning.
- Wrenches and Screwdrivers: For removing access panels and components.
- Cleaning Solution: Use a specialized AC evaporator cleaner or a mixture of mild detergent and water.
- Compressed Air: For blowing out debris from the valve and surrounding areas.
2. Locate the Expansion Valve
The expansion valve is typically located near the evaporator coil within the AC system. Refer to your vehicle’s service manual or consult with a professional technician to locate the valve accurately.
3. Prepare the AC System
If necessary, evacuate the refrigerant from the system using proper recovery equipment. Follow safety guidelines and regulations when handling refrigerants.
4. Remove Access Panels
Using wrenches and screwdrivers, remove any access panels or covers that obstruct access to the expansion valve and surrounding components.
5. Clean the Expansion Valve
Apply the cleaning solution to the expansion valve and surrounding areas, ensuring thorough coverage. Use a soft brush or cloth to scrub away dirt, debris, and buildup from the valve surfaces.
6. Flush with Compressed Air
Once the valve is clean, use compressed air to blow out any remaining particles or residue. Pay close attention to the valve’s inlet and outlet ports to ensure they are free of obstructions.
7. Reassemble and Test
After cleaning, reassemble any removed components and panels, ensuring proper sealing and alignment. Test the AC system to verify that the expansion valve is functioning correctly and that cooling performance has improved.
Conclusion
Regular maintenance, including cleaning the expansion valve, is essential for ensuring optimal performance and longevity of your car’s air conditioning system. By following the steps outlined in this guide, you can effectively clean the expansion valve and restore cooling efficiency to your vehicle.
https://www.acparts.cn/product-category/expansion-valves/
Introduction
In the dynamic realm of agriculture, where efficiency and comfort are paramount, the integration of aftermarket air conditioning kits for tractors marks a significant advancement. These kits not only enhance operator comfort but also contribute to the overall efficiency of farming operations. This comprehensive guide explores the benefits, features, and considerations associated with aftermarket air conditioning kits for tractors, shedding light on their pivotal role in modern agricultural practices.
Understanding the Need
Operator Comfort
Farming often entails long hours spent in the field, subjecting operators to varying weather conditions. Aftermarket air conditioning kits alleviate discomfort by providing a cool and comfortable environment within the tractor cabin, ensuring operators remain focused and productive throughout their tasks.
Equipment Performance
High temperatures can adversely affect machinery performance, leading to decreased efficiency and potential breakdowns. Air conditioning systems help maintain optimal operating temperatures, preserving the integrity of critical components and prolonging the lifespan of tractors.
Features and Benefits
Enhanced Cooling Capacity
Aftermarket air conditioning kits are designed to deliver powerful cooling performance, effectively lowering cabin temperatures even during scorching summer days. This ensures operators can work comfortably regardless of external weather conditions.
Customizable Solutions
These kits offer customizable solutions tailored to the specific requirements of different tractor models. From compact utility tractors to large-scale agricultural machinery, aftermarket air conditioning kits can be seamlessly integrated to meet the unique needs of each application.
Energy Efficiency
Modern aftermarket air conditioning systems prioritize energy efficiency, utilizing advanced technologies to optimize cooling performance while minimizing power consumption. This not only reduces operational costs but also promotes sustainability within the agricultural sector.
Durability and Reliability
Built to withstand the rigors of agricultural environments, aftermarket air conditioning kits are engineered using high-quality materials and components. Their robust construction ensures durability and reliability, even in demanding field conditions.
Considerations for Installation
Compatibility
Before purchasing an aftermarket air conditioning kit, it is essential to ensure compatibility with the tractor model. Manufacturers often provide compatibility guides or offer assistance to help customers make informed decisions.
Professional Installation
While some enthusiasts may attempt DIY installations, professional installation is recommended to ensure proper integration and functionality. Experienced technicians possess the expertise and tools necessary to install aftermarket air conditioning kits correctly.
Maintenance and Care
Regular Inspections
Routine inspections are crucial to ensure the continued performance of aftermarket air conditioning systems. Inspecting components such as filters, condensers, and refrigerant levels helps identify potential issues early on and prevent costly repairs.
Filter Replacement
Regular filter replacement is essential to maintain air quality and system efficiency. Clogged or dirty filters can restrict airflow, reducing cooling capacity and placing additional strain on the system.
Professional Servicing
Periodic servicing by qualified technicians is recommended to address any maintenance needs and ensure optimal system performance. Professional servicing may include refrigerant recharge, leak detection, and overall system inspection.
Conclusion
Aftermarket air conditioning kits for tractors represent a significant advancement in agricultural technology, offering enhanced operator comfort and equipment performance. With their customizable solutions, energy-efficient designs, and robust construction, these kits are revolutionizing agricultural practices worldwide. By prioritizing comfort and efficiency, farmers can optimize their operations and maximize productivity, ensuring a prosperous future for the agricultural industry.
https://www.acparts.cn/product-category/parking-cooler/

Car air conditioning (AC) systems are essential for comfortable driving, especially during hot summer months. However, over time, these systems may lose efficiency and require maintenance. One crucial aspect of AC maintenance is vacuum pumping, which removes air and moisture from the system to ensure optimal performance. In this guide, we’ll explore how to vacuum pump your car AC effectively.
Understanding Car AC Systems
Before diving into the vacuum pumping process, it’s essential to understand how car AC systems work. A typical car AC system consists of several components, including a compressor, condenser, evaporator, and expansion valve. These components work together to cool the air inside the vehicle cabin.
Signs that Your Car AC Needs Vacuum Pumping
Several indicators suggest that your car AC may need vacuum pumping. These signs include weak airflow, warm air blowing from the vents, and unusual noises when the AC is turned on. If you notice any of these symptoms, it’s crucial to address them promptly to prevent further damage to the system.
Tools and Equipment Needed for how to vacuum pump car ac
To vacuum pump your car AC, you’ll need specific tools and equipment, including a vacuum pump, manifold gauge set, and refrigerant recovery machine. These tools allow you to evacuate the system efficiently and ensure that it’s free of air and moisture.
Step-by-Step Guide how to vacuum pump car ac and how long to vacuum car ac system
- Preparation: Begin by parking your car in a well-ventilated area and engaging the parking brake. Ensure that the engine is turned off before starting the vacuum pumping process.
- Locating AC Components: Identify the AC compressor, condenser, evaporator, and other relevant components under the hood of your car.
- Connecting the Vacuum Pump: Attach the vacuum pump to the low-pressure port on the AC system using the manifold gauge set. Follow the manufacturer’s instructions for proper connection.
- Evacuating the System: Turn on the vacuum pump and let it run for about 30 minutes to evacuate the system fully. Monitor the pressure readings on the manifold gauge set to ensure proper evacuation.
- Checking for Leaks: After evacuating the system, close the valves on the manifold gauge set and turn off the vacuum pump. Use a leak detection tool to check for any leaks in the AC system.
- Recharging the System: If no leaks are detected, you can proceed to recharge the AC system with refrigerant using the refrigerant recovery machine. Follow the manufacturer’s instructions for proper recharging procedures.
Safety Precautions
When vacuum pumping your car AC, it’s essential to observe safety precautions to prevent accidents or injuries. Wear eye protection, ensure proper ventilation in the area, and avoid direct contact with refrigerant, as it can cause skin irritation or burns.
Benefits of Vacuum Pumping Car AC
Vacuum pumping your car AC offers several benefits, including improved cooling performance, extended lifespan of AC components, and prevention of contaminant buildup. By removing air and moisture from the system, vacuum pumping ensures that your car AC operates efficiently and effectively.
Conclusion
Maintaining your car AC system is essential for comfortable driving, especially during hot weather. Vacuum pumping helps remove air and moisture from the system, ensuring optimal performance and longevity. By following the steps outlined in this guide and observing safety precautions, you can vacuum pump your car AC effectively and enjoy cool, refreshing air on your travels.
FAQs
- How often should I vacuum pump my car AC? Vacuum pumping your car AC is recommended as part of regular maintenance, typically every 1-2 years.
- Can I vacuum pump my car AC myself, or should I hire a professional? While vacuum pumping can be done DIY, it’s essential to have the necessary tools and knowledge. If you’re unsure, it’s best to consult a professional mechanic.
- What type of refrigerant should I use to recharge my car AC after vacuum pumping? Refer to your vehicle’s owner’s manual or consult a professional mechanic to determine the appropriate refrigerant for your car AC system.
- What should I do if I detect a leak in my car AC system during vacuum pumping? If you detect a leak, it’s crucial to have it repaired by a professional mechanic to prevent further damage to the AC system.
- Can vacuum pumping my car AC improve fuel efficiency? While vacuum pumping alone may not directly improve fuel efficiency, it ensures that the AC system operates efficiently, which can indirectly contribute to better fuel economy.
https://www.acparts.cn/air-conditioning-parts-2/

Embarking on a camping adventure doesn’t mean sacrificing comfort. In this guide, we delve into the world of tent air conditioners, unlocking the secrets to staying cool and comfortable in the great outdoors. Whether you’re a seasoned camper or a novice explorer, our comprehensive insights will elevate your camping experience.
Understanding Tent Air Conditioners
Introduction to Tent Air Conditioners Explore the innovative world of tent air conditioners and how they revolutionize camping comfort. Uncover the technology that brings cool relief to your tent, making camping a breeze even in the hottest weather.
Why Choose a Tent Air Conditioner? Discover the undeniable benefits of opting for a tent air conditioner. From beating the summer heat to ensuring a good night’s sleep, these portable devices are your ticket to a refreshing camping experience.
Essential Features for Comfort
Portability at Its Finest Explore the compact and lightweight design of tent air conditioners, making them easy to carry and set up at your campsite. Experience cool comfort without the burden of heavy equipment.
Battery Efficiency Delve into the energy efficiency of tent air conditioners. Learn how they optimize battery usage, ensuring you stay cool throughout your camping trip without worrying about power consumption.
Setting Up Your Tent Air Conditioner
Choosing the Right Location Get insights into selecting the perfect spot for your tent air conditioner. Discover the ideal placement to maximize cooling efficiency and create a comfortable environment inside your tent.
Installation Made Easy Follow a step-by-step guide on setting up your tent air conditioner. From securing it in place to connecting power sources, our instructions guarantee a hassle-free installation process.
Maintaining Your Tent Air Conditioner
Cleaning and Storage Tips Ensure the longevity of your tent air conditioner with proper cleaning and storage practices. Learn the essential maintenance steps to keep your device in top-notch condition for future camping trips.
Tent Air Conditioner: An Essential Camping Companion
A Cool Night’s Sleep Experience the luxury of a cool and comfortable sleep in your tent. Our guide highlights the importance of a well-regulated temperature for a restful night amidst nature.
Camping Beyond Summer Unlock the potential of extending your camping season with a tent air conditioner. Learn how these devices make it possible to enjoy the great outdoors in various weather conditions.
FAQs – Your Burning Questions Answered
How does a tent air conditioner work?
Discover the science behind tent air conditioners and how they effectively cool the air within your tent.
Can I use a tent air conditioners with any type of tents?
Explore the compatibility of tent air conditioners with different tent types and sizes, ensuring you find the perfect match for your camping setup.
Are tent air conditioners noisy?
Learn about the noise levels of tent air conditioners and how to choose a model that ensures a peaceful camping experience.
What power source do tent air conditioners require?
Understand the power requirements of tent air conditioners, whether they run on batteries, solar power, or external generators.
Are tent air conditioners suitable for all climates?
Explore the versatility of tent air conditioners and how they adapt to various climates, providing comfort in both hot and cool weather.
Can I use tent air conditioners in a camper van or RV?
Discover the flexibility of tent air conditioners, and find out if they can be utilized in camper vans or RVs for added comfort during travel.
Conclusion: Stay Cool, Camp Cooler
Elevate your camping experience with the cool comfort of tent air conditioners. From understanding their essential features to mastering the setup process, this guide equips you with the knowledge to turn every camping trip into a refreshing adventure.
Anchor Group: Elevating Your AC Experience. Your trusted source for OEM and aftermarket AC parts and tools. Discover exceptional value, convenience, and service.